November 15, 2012
Viennoiserie Final
Today was day nine in my Viennoiserie class. For our final we had to make danishes and cinnamon buns. This was not a difficult task to do but it was hard to make sure that each pastry was exactly the same. When we made danishes, they all had to be the same shape and size and have the same filling. This is a lot easier said than done especially when you have a time limit to have everything completed. The cinnamon buns were another story. We had to roll out the dough and put pecans and raisins on top. Once you roll up the dough, you have to cut out 4 ounce pieces. Now between the thickness of the dough and amount of ingredients you decide to put on top of the dough, it's hard to tell how much is 4 ounces. So you basically have to guess and if you cut it too heavy then you can just cut more off but if you have less then you can't do anything about it. It's unfortunate because our chef would weigh the cinnamon buns and if they weren't 4 ounces then points would be taken off. But other than every pastry having to be exactly the same, it wasn't that hard to do. Well today is not only my last day of class but also my last class for this trimester. I have a 10 day break and then when I come back I will start academics. I'm not really excited about that but I may as well get it over with. So the next time I have labs will be in the spring so I will let you know all about those and everything that happens. See ya then!
November 13, 2012
Cinnamon Rolls
Well I am still in my Viennoiserie class and we made cinnamon rolls the other day. They were delicious! Here's the recipe:
9 oz. Sugar,
gran.

 Glaze: Mix confectioner’s sugar with water until
Cinnamon
Buns (Sweet Dough)
3 oz. DMS
0.5 oz. Salt
9 oz. Butter,
soft
9 oz. Whole
Eggs
1
# 4 oz. Water or Milk
3
# 8 oz. Bread Flour
5 oz. Yeast,
fresh
Vanilla
Extract
Lemon
Extract
Straight
dough mixture: 3 minutes 1st
speed, and then 10
minutes 2nd speed. Bulk fermentation 20-
30 minutes. Roll out dough to desired shape (1/8 - 1/4 inch thick),
brush with water or egg wash
and sprinkle cinnamon sugar, then golden raisins
and crushed walnuts (almonds or pecans may be
used as well) on top. Roll the dough together to a log. Using a serrated knife, cut 4 oz. pieces and
place them on a
paper lined sheet pan (3 x 4). Proof to 75 %. Bake at 375 degrees F. until golden
brown.

 Glaze: Mix confectioner’s sugar with water until
a thick
consistency is reached.
Drizzle over the top of the cinnamon buns. To do this you dip your hand into the glaze then spread your fingers out and let the glaze just fall onto the cinnamon rolls while you move your hand back and forth over the cinnamon rolls.
These are absolutely delicious. They will be the best homemade cinnamon rolls you will ever make!
November 8, 2012
Danishes
The past few days in class we have been making danishes. We made the dough one day, shaped them, and now finally baked them today. They were delicious. The recipe for this is written below:
Danish Dough


Danish Dough
3
# 8 oz. Bread Flour
1
# 9.75 oz. Milk
6.25 oz. Whole
Eggs
6.75 oz. Sugar,
gran.
1
oz. Salt
2
oz. Yeast, fresh
1.5
oz. Butter, soft
Roll-in fat:
1
# 11 oz. Butter, soft
Straight
dough mixing (top ingredients only): 3
minutes 1st speed, then 8 minutes 2nd speed.
Cover and chill the dough for 30 to 60 minutes. Then soften the roll-in fat.
Roll out the dough to a rectangle, then spread the roll-in fat
over two thirds of the dough.
Give the dough a 3-fold. Cover and refrigerate for 20-30
minutes.
* A three fold is when you fold a third of the dough over and then a third from the other side on top, like an envelop.
Roll out the dough and give another 3-fold. Refrigerate (or
freeze for 30 minutes).
Roll out the dough again and give it a 4-fold.
* A four fold is when you fold one side to the center, and then the opposite side to the center and then fold it again in half.
Cover and retard the dough over night.
Bake at 375 degrees F. until golden brown. When it comes out let it cool for a few minutes then put a glaze with Apricot Preserves then with Fondant or a
sugar glaze on top.


Above is just one example of the danishes that we made. They can be all different shapes but they are all delicious. We made an apple filling for ours and it is definitely my favorite, although you can use any filling that you want. These danishes take a lot of work and patience but they are definitely worth it.
November 6, 2012
Viennoiserie
I started my last class for my first trimester of college. Viennoiserie is the name of my class and it just means enriched breads. A few of the things we will make in this class are croissants, danishes, scones and doughnuts.Yesterday we muffins and the dough for brioche. Today we finished the brioche and made the dough for croissants. Brioche is just dough that is shaped in a little tin and then has a ball of dough on top. Why you would go through the trouble of putting a little ball of dough on top, I have no idea. We put pepper jack cheese in ours and it was pretty good.Today we made the croissant dough and it gets really complicated.
Croissant Dough
Croissant Dough
2 # 10
oz. Water (cold)
5
oz. Sugar, gran.
2.5 oz. Salt
5
oz. DMS
3.5 oz. Yeast,
fresh
5
# Bread Flour
5
oz. Butter, soft
Roll-in fat:
3
# Butter
2.5 oz. Bread
Flour
Straight
dough mixing: 3
minutes 1st speed then 8 minutes 2nd speed.
Cover and chill the dough for 30 to 60 minutes. Combine the 3 # butter (room temperature) with the 2.5 oz.
flour. Roll out the dough to a rectangle, then spread the roll-in
fat over two third of the dough. Give the dough a 3-fold. Cover and refrigerate for 20-30
minutes. Roll out the dough 3 more times (rotate 90 degrees at the
start of each rolling process), and give it each a 3-fold. Refrigerate after
each fold for 20-30 minutes. Cover and retard the dough over night. Roll out the dough to 1/8 - 1/4 inch in thickness, cut into
triangles and shape to a croissant (fillings can be added as well as toppings). Place on a paper lined sheet pan 3 x 5, egg wash and proof
to about 75 %.
Egg wash again and bake at 375 degrees F. until golden
brown. No second egg wash is needed if the croissants have a
topping.
November 5, 2012
 |
| Challah Breads |
 |
| Ciabatta Bread |
November 4, 2012
Breads
So in my last post I described how it is easy to make the bread dough and the fun part comes when we shape the breads. When you go out to eat, most places often serve dinner rolls which are just plain round balls of bread. Now they taste delicious so most people don't really care what they look like but we learned a really easy way to make these plain rolls look more decorative. You start off with the same amount of dough as you would a plain roll and roll it out to a log. You then take the two ends and tie a knot. Once you have done this, you should have two ends hanging out. You simply tuck one end around the outside and then the other on the opposite side. And you will get the little ends sticking out of the top, which you can see in the picture on the bottom right. The picture on the left is an example of a simple dinner roll that has seeds on top. And the one on the left is our knotted rolls. There is nothing wrong with a plain roll because they taste the same, this just gives it a nice appearance.


October 29, 2012
Artisan Breads
 Well now that I am finally done with Cakes, I now get to start learning about different kinds of breads. We have learned a lot in this class so far but it is very similar to what we learned in How Baking Works. When we make our breads they are pretty much the same process. There are four main ingredients to bread; bread flour, salt, yeast and water. This is known as a lean dough. You scale all of these ingredients following the recipe and then just mix them all together. It's pretty simple but makes amazing breads. The fun part comes in when we get to shape the dough. We made Challah bread the other day which was really fun to make. This type of bread is called an enriched bread because other ingredients are added to the main four such as sugar, eggs and fats. A lot of people think that Challah bread is defined just by its braiding, but it is actually called Challah bread because egg yolks are used in this bread which is rare. The shape of the dough does not matter just that it has the yolks in it. It is most common to see it braided; you can make a three, four, five or six braid Challah bread. I made a three and a six. Now if making the six braid, you start off with six little balls of dough and roll them out to eight or nine inches long. You then pinch all six strands of dough at the top and then move them in a certain way to get a nice braid when you are finished. Each strand is numbered one through six and it is determined by the position of the strand. So if you move a strand then its number will change. The pattern for a six braid is: cross two over six, one over three, five over one and then six over four. It may look odd at first but if you keep repeating it then it will come together. This bread was personally my favorite that we have made so far, it's also really good for french toast. The picture above is my six braid challah bread that I made in class. Now you can add seeds on the top of these as well to add flavor and texture. It's delicious either way. I really like this class and I'll tell you more about all the cool things I learn.
October 22, 2012
More and More Cakes
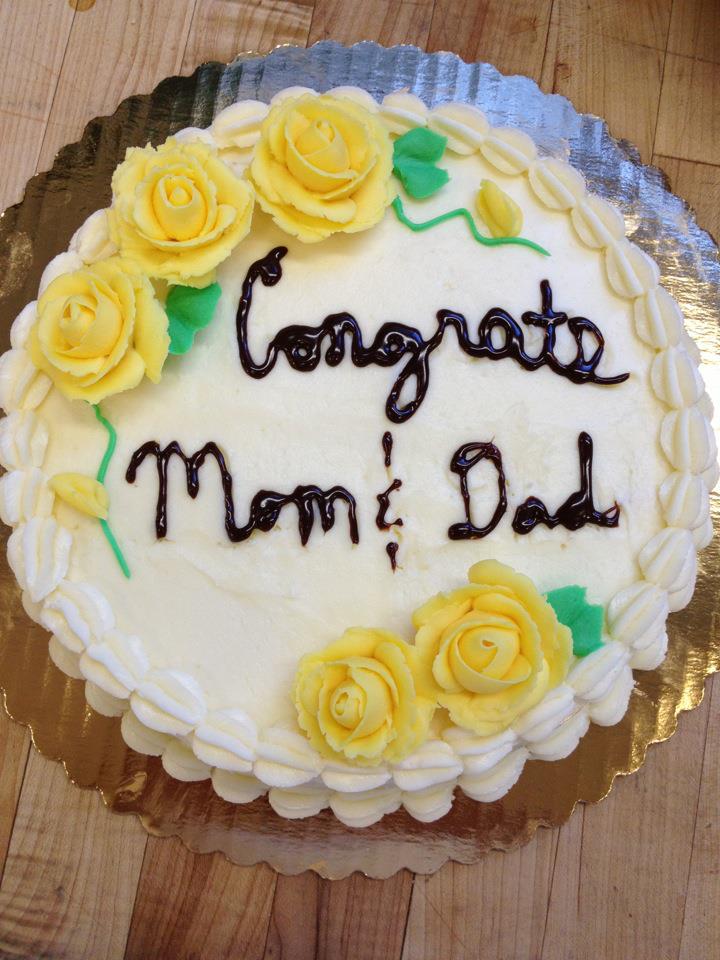
This past week has been very crazy. I've been trying to study and do other things so I'm sorry it's been a while since I've posted anything. This class was unfortunately not one of my favorites. I was really excited about it and learning all new tricks and tips about baking and decorating cakes but I didn't learn that many new things. Granted I did just learn a lot of it in How Baking Works but I thought there would still be more to learn. But anyways, like I said before, each day we either bake our cakes and icings or we decorate the cakes we made the day before. We have made some really pretty cakes but honestly my favorite was the simple German Chocolate Cake we made at the very beginning. Of course that might just be because I'm a chocolateholic. Now don't get me wrong, the cakes were good I just prefer chocolate. Anyways, for our final we had to make two cakes. The two cakes I made are the very first two pictures I have posted. They both have three layers which are 1/16th of an inch tall. The picture on the left has a mocha buttercream which is why it has coffee beans on top. And the one of the right is a chiffon cake. It says Congrats Mom and Dad because it was their anniversary on October 18th. Now as you can see on all of our other cakes we have never done roses or writing on our cakes so why we had to do it on our final I'm still wondering about. I think it was crazy to critic us on something we never done before but oh well. I liked the class but I also think it could have been better. But it doesn't matter because it's over now. On to Artisan Breads for my next class!!


October 10, 2012
Intro to Cakes
 I have now started my third class, Intro to Cakes. I am really excited about this class because I love decorating cakes. So pretty much in this class one day we bake the cakes and icings and then the next day we decorate those cakes. So for example, yesterday was my first day of class and we made carrot cake, German chocolate cake, the filling for the German chocolate cake, and the icings. And then today we decorated and filled both cakes. The first cake we decorated was the German chocolate cake. You, of course, have to start off by making the top of the cake level. In my opinion, I just think this is a waste of cake but on the other hand I just eat the extra during class so I'm okay with it. You then cut it in half, which is really hard when just using a knife. When you have it cut, you take one half and put half of the filling on top and then put the other half of cake on top making a sandwich. Once you have this done, you can ice the cake and put a shell border on top. The very last step you do is put the filling on top, this is so that is looks nicer and has a nice edge on it. This is my final cake that I made in class today. It was sooo delicious!!!
The other cake we made was carrot cake. You start off the same way and level it off. Then apply icing all over the cake and also put a shell border on the top. The reason why we don't pipe shell borders on the bottom is because they don't stick well to the cake. This means that when you serve the cake this border is often left on the platter because it fell off which is just a bad look for the cakes. For carrot cake we normally put pecans on the sides for decoration and they taste great with the cake. The other decoration that we used was piped carrots on top. Well we wanted to make sure that every person got a carrot so we had to portion the cakes first. This is really hard when using a knife because you have to make sure that each piece is exactly the same size. But after we got that done, we piped a carrot on each piece. To the right is the cake that I made today. I really liked making these cakes and they taste really good too.
How Baking Works Final
There was a lot to do with our final for this class. We had a written test and also a practical where we had to actually bake something. Our practical was done with our group. So everyone's practical was to make a pound cake. The problem was that each group had to make this pound cake either gluten free, egg free or fat free. My group luckily had gluten free. We had to take what we had learned in class and substitute different ingredients to make the regular recipe gluten free. For the original recipe, it called for 9.3 oz of cake flour but that has gluten in it so we had to use other kinds of flour that wouldn't produce gluten. So on day 8 we made the original (control) recipe of pound cake and then five experiments using different kinds of flour to try and make it taste like the original. Most gluten free cakes use a mixture of flours. The most common is rice flour, potato starch and xanthan gum. We tried this and used it as one experiment. Another test we did was use the same mixture but replace the rice flour with sorghum flour. Then we used all almond flour for the third experiment. Out fourth experiment used half almond and half hazelnut flour. The last try we did was with all coconut flour. Once all of these were baked you could see how differently they turned out. We made all of the pound cakes in muffin tins so that they could bake faster and it makes it easier for each group to get a sample of your experiments. So most of our pound cakes came out with a lot of grease on the bottom. There were puddles on the bottom of the tins. It was gross. We figured out that this happened because all of the flours that we used were nut flours. Well nuts have oil in them and so when they were baked the oil came out plus the cakes already have butter added to them as well. This gave them too much moisture. This then affected the structure causing some of them to fall in the middle. Other experiments like coconut were the opposite and had way to much structure. Below is a picture of all the different experiments we did. You can see how different they turned out.

*The top is our control then going down is the almond/hazelnut mixture, the common mixture, all almond, sorghum and then coconut on the bottom*
We thought that our experiment using all almond flour turned out the best. It didn't have a good structure but it had the flavor that we were going for. So the next day, our final day, we had to take the best recipe from day 8 and try to perfect it. Basically we had to take our almond and do at least three more experiments to make it even better. So we did a almond and sorghum mixture because we liked the taste of the almond but the structure of the sorghum. Our chef brought in sweet potato so we decided to just try all of that in one batch. And then we did another almond but we reduced the butter so it wouldn't have the puddles on the bottom. These experiments turned out really well. We had to look at the texture, structure and the flavor to decide which one was the best. In the end we thought that the almond with reduced butter was the best. It had the right flavor and had a pretty good structure like our control. It was amazing seeing how different the experiments came out and then figuring out why that happened. We did very well on our final and ended up getting an A on it. It was fascinating and I will actually miss this class.
October 2, 2012
I have been very busy this past week with all of the new information I have had to learn. Each day we have had a new topic such as gluten free, sugar free and egg free. They have all been very interesting. The gluten free day was pretty interesting. We know that flour is a structure builder which just means that it helps provide a strong structure when it is baked. And it also absorbs liquid, contributes to the flavor and color and adds nutritional value. The most important components of flour are 71% starch, 6-18% protein, moisture and gums. Glutenin and gliadin make up about 80% of the proteins. Glutenin provides strength and gliadin contributes to the elasticity of the bread. Gluten is activated by moisture and motion. When moisture is added, glutenin and gliadin absorb the water and then swell up. Then when mixing, every surface is exposed to the liquid making it easier for the proteins to absorb more water. Also the mixing incorporates more air which strengthens the gluten when it is forming. There are many factors that affect gluten development such as the type of flour, amount of water, amount of mixing, water pH and many other things. To make a gluten free recipe you have to use specific flours that will not produce gluten. These will include millet flour, white or brown rice flour, garbanzo flour, tapioca flour and xanthan gum. More than one flour is normally used in recipes for gluten free.
Sugar day was very informative. There are basically three different types of sweeteners; crystalline sugars, syrups, and specialty sweeteners. Crystalline sugars are granulated sugars, coarse sugars or powdered sugar. Examples of syrups are obviously molasses, honey, maple syrup and malt syrup. And lastly specialty sweeteners are isomalt, dextrose, sweet-n-low and splenda. All of these sweeten, contribute color, and tenderize. Although they have a lot of the same functions they can taste very different. For example you can't just replace granulated sugar with maple syrup because it will give it a completely different taste and texture.
Egg day was very similar to our sugar day. There are many egg products that you can use but there are advantages and also disadvantages when using them. Egg products are easier to store and measure and to work with but they are normally more expensive than fresh eggs. Eggs provide structure, help emulsify which means that they help mix oil and fats that don't normally mix well, they also contribute flavor and color. Just like the sugar, when you use different egg products than in the recipe you will probably get a different result. Either the texture or taste or color will be different in the final product. We make experiments everyday with one recipe and switch out one ingredient with several alternatives and look at the differences. It can be very dramatic what the results will show but it proves that you need to follow the recipe completely to get the correct conclusion.
We have done many experiment each day and have tasted horrible results but it has shown what each ingredient does and how it affects the product. Well tomorrow is day 8 so we are going to start on our final. My group has to come up with four experiments to do for a gluten free pound cake . So we'll see how that goes, hopefully well.
September 24, 2012
How Baking Works
Today was my first day of How Baking Works. This class is going to be completely different from Chocolates and Confections. In this class we learn all about the science in baking. It is very interesting but there is a lot of information that we are going to have to learn. For example the whole baking process. Baking is a process of traveling heat that transforms batter or dough into a firmer product. There are many different, complex steps in this process but I'll just give you a synopsis of it. When you put something in the oven to bake, the fats will start to melt and gases will form and start to expand. This essentially makes the baked good more tender. Then the sugars will start to melt making a kind of syrup; this for example helps with cookies spreading out. As the product gets around 140 degrees F. microorganisms die and the egg and gluten proteins coagulate. The egg and gluten proteins are very important to the structure of the baked good. After this step, the starches start to gelantinize, or set. Now the gases will start to evaporate which will lead to the development of the crust. It will then start to caramelize. The last part of the baking process is that the enzymes are now inactivated, the nutrients will start to change and the pectin will break down. When all of this has occurred, the product will finally be completely baked. This is a very intricate process that most people don't know.
Today for our production we made chocolate chip cookies and muffins. We have 7 groups and 6 groups made the cookies. Each group used the same ingredients and measurements but used a different method of mixing it. It is fascinating how differently they turned out. This proves that you have to follow the directions completely so that you get the correct finished product. My group had a different experiment and made 3 different types of muffins. We used the same ingredients and measurements also but all 3 muffins turned out differently. The first muffin we made was with the creaming method. This method just means that you cream the shortening or butter and mix the dry and wet ingredients separately. Then alternate mixing in the dry and wet ingredients until everything is incorporated together. The next method we used was the blending method. This is very easy, you just melt the shortening and mix that with the other wet ingredients. Then you combine all the dry ingredients together. When you have both of these you just add them all together and mix. This recipe is only different because you mix all the ingredients at one time instead of alternating between wet and dry. The last method we made was a biscuit method. For this, you once again mix the dry ingredients together and then the wet. But then you take the shortening and mix it into the dry ingredients like you're making a pie crust or biscuits. And then just add in the wet ingredients. I would recommend using the creamy method because it worked out the best in this experiment. There is so much more to learn and I'm intrigued on what else we will learn. Tomorrow is going to be extremely interesting because we are going to lean about gluten free foods. I can't wait to receive all this knew information and I'll tell you everything I learn.
Today for our production we made chocolate chip cookies and muffins. We have 7 groups and 6 groups made the cookies. Each group used the same ingredients and measurements but used a different method of mixing it. It is fascinating how differently they turned out. This proves that you have to follow the directions completely so that you get the correct finished product. My group had a different experiment and made 3 different types of muffins. We used the same ingredients and measurements also but all 3 muffins turned out differently. The first muffin we made was with the creaming method. This method just means that you cream the shortening or butter and mix the dry and wet ingredients separately. Then alternate mixing in the dry and wet ingredients until everything is incorporated together. The next method we used was the blending method. This is very easy, you just melt the shortening and mix that with the other wet ingredients. Then you combine all the dry ingredients together. When you have both of these you just add them all together and mix. This recipe is only different because you mix all the ingredients at one time instead of alternating between wet and dry. The last method we made was a biscuit method. For this, you once again mix the dry ingredients together and then the wet. But then you take the shortening and mix it into the dry ingredients like you're making a pie crust or biscuits. And then just add in the wet ingredients. I would recommend using the creamy method because it worked out the best in this experiment. There is so much more to learn and I'm intrigued on what else we will learn. Tomorrow is going to be extremely interesting because we are going to lean about gluten free foods. I can't wait to receive all this knew information and I'll tell you everything I learn.
September 20, 2012
Final Exam
So today was my last day in Chocolates and Confections. We had a 50 question test and then we had to make 35 Egg Milk Ganache Pralines. Everyone was very stressed obviously because it was our final which was 20 percent of our grade and it was the first time we had to do everything on our own. It was very nerve wracking but somehow we made it through. The Egg Milk Ganache Pralines are very delicious but are made in a very specific way.
Melt
the sugar (some water may be used) until golden brown (about 340 degrees F.).
Shock the sugar by adding the mixed egg yolk/heavy cream. If fresh eggs are
used, make sure to reach the stage of nape (170 B 180 degrees F.) at some
point. Pour the hot sugar over the melted couverture and incorporate quickly
using a hand whisk. Whip until ganache is emulsified and smooth. Let the
ganache cool down in the bowl until it firms (will take about 2 hours).
Egg
Milk Ganache Pralines Yield:
about 50 Pralines
1.75 oz. ( 50
gr.) Granulated Sugar
1 oz. ( 28 gr.) Egg Yolks
4.5 oz. (127 gr.) Heavy Cream
11.9 oz. (338 gr.) Milk Couverture
Pour
onto parchment paper in between 2 metal bars (1 cm thick). Place a parchment
paper on top and roll even with a rolling pin - let set (over night).
Remove
the top paper and the metal bars, flip to the opposite side and coat the bottom
with tempered semi-sweet couverture. Let set and flip to the original side.
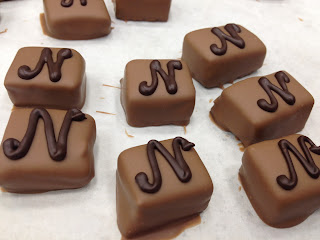
Mark
and cut into 2x2.5 cm pieces. Coat with milk couverture and pipe an “N” on top
of each praline using tempered semi-sweet couverture.

There are many reasons that can make this recipe difficult. The very first thing you have to make is the ganache and you have to make sure you don't under or over mix this. If you do, then the ganache will later separate which can mess up the whole praline. After you put a thin layer of tempered dark chocolate on top, then you have to cut out each individual praline. This is a whole lot harder than you think it would be. Our chef came by with a ruler and measured each one to make sure that they were the correct size. But when you think about it, if you buy two chocolates for you and someone else, who would get the bigger piece? I know for a fact that if I got the smaller piece I would be pretty upset. So you have to make sure that each piece is exactly the same size. Covering the praline in milk chocolate is pretty easy once you have it tempered. But piping an "N" on the top is another story. You have to make sure it is thin enough to pipe but not too thin that it will run everywhere. This is also tricky but once you get some practice it gets easier. Even though there are a few things that can be difficult, it is definitely worth it. These pralines are delicious and are worth every second you put into them. Well now I start a new class on Monday so we'll see how that goes.
September 19, 2012
Chocolate Box
This is my chocolate box.

Its supposed to be a shooting star if you can't tell and like I said I was taking it easy. It's a lot harder than we expected especially since we've never done anything like this. It was a good learning experience but I don't know how many more chocolate boxes I will be making. Well tomorrow I have my final and I can't believe I'm almost done with my first class. It's crazy but I'm ready to get on with the new things I will learn next.
September 15, 2012
Ganache
Ganache is very simple but delicious treat to make. It has two main ingredients: cream and chocolate. To make this incredible mixture, bring the cream to a boil and then add the chocolate. It's as simple as that.The reason why you need to bring the cream to a boil instead of just heating it up is to ensure proper melting of the chocolate and it will kill any bacteria in the cream. You can also add other ingredients to this such as sugar, alcohol or other flavors. Ganache is very good and can be used in many recipes. We made Soft Ganache Round Truffles in class the other day and they are addicting. I've had so many of them!!

These little truffles will become your favorite thing in the world once you try them. You can also make another version and put caramel in the inside of the milk couverture shells. Another recipe that you must try!!
Soft Ganache Round
Truffles Yield:
about 100 Pralines
5.75 oz. ( 163 gr.) Butter
3
oz. ( 85 gr.) Fondant
3 oz. (
85 gr.) Glucose
7 oz. ( 199 gr.) Heavy Cream
11.5 oz. ( 326 gr.) Milk Couverture
Bring the butter,
fondant, glucose and heavy cream to a boil. Add the chopped chocolate and
incorporate.
Let cool to about 80 -
85 degrees F., then pipe into round milk couverture shells.
Seal the top of the
shell with tempered milk couverture.
Coat with milk
couverture with your hands or make them spiky by using a wire rack.

September 13, 2012
Pralines
There is a vast assortment of delicious chocolate treats out there but many people don't know the difference between them. A truffle is a treat that has to contain ganache but a praline is a treat that contains any form of chocolate on the inside or outside. A praline also does not include any baked products inside it but can be a mixture of caramelized sugar and toasted nuts. The first pastry we made in class was an Apricot Butter Truffle. Now this is classified as a truffle and a praline because it has chocolate and ganache in it.

Apricot Butter
Truffle Yield:
about 130 Pralines
10 oz. (284 gr.) Butter
10 oz. (284 gr.) Fondant
5 oz.
(142 gr.) Apricot Brandy
14 oz.
(400 gr.) Milk Couverture
10 oz. (284 gr.) Semi-Sweet Couverture
Soften the butter, add
the fondant and cream mixture. Add the apricot brandy slowly (best temperature
is around 80 degrees F.), no lumps. Combine the milk- and semi-sweet couverture
and melt to 100 degrees F., then whip into the butter mixture.
Pipe with a No. 4 star
tip onto semi-sweet couverture stencils (23 mm in diameter).
Let the ganache set
until it has produced a skin (that will take about 2 hours).
Coat the pralines with tempered
milk couverture. Do this by putting the point side down into the chocolate and then flipping it over with a fork in the chocolate and then tap the excess off. To decorate, use a tempered semi-sweet couverture dot on top.

This is what the truffles should look like and if you want to put the dot of chocolate on top that is just another step. If you like dark chocolate then you definitely love these truffles.
September 11, 2012
Hi everyone,
Since this is my very first blog, let me tell you a little about myself. I just graduated from high school and just recently started college at Johnson and Wales. I was really nervous about leaving my home and everyone I love but so far I'm loving it. I really like my roommates and my class is really cool. For people who don't know, JWU is a culinary school and I am studying Baking & Pastry. Each lab class is 9 days long and each day is 6 hours long. My first class is Chocolate and Confections. I am already a huge chocolate lover and now I get to have a whole class about it?! This is awesome! Yesterday in class we learned all about where chocolate comes from and how it is made from the tree to our table in class. It is very fascinating how much work and time has to go into to making chocolate but that's why it is so delicious. I can't wait to start creating many new desserts in class and I'll tell you all about them!
Since this is my very first blog, let me tell you a little about myself. I just graduated from high school and just recently started college at Johnson and Wales. I was really nervous about leaving my home and everyone I love but so far I'm loving it. I really like my roommates and my class is really cool. For people who don't know, JWU is a culinary school and I am studying Baking & Pastry. Each lab class is 9 days long and each day is 6 hours long. My first class is Chocolate and Confections. I am already a huge chocolate lover and now I get to have a whole class about it?! This is awesome! Yesterday in class we learned all about where chocolate comes from and how it is made from the tree to our table in class. It is very fascinating how much work and time has to go into to making chocolate but that's why it is so delicious. I can't wait to start creating many new desserts in class and I'll tell you all about them!
Subscribe to:
Posts (Atom)